Replacing a broken hydraulic seal on a floor jack is a straightforward DIY repair that can restore its lifting power and safety, typically taking 1-2 hours to complete. This process involves draining old fluid, disassembling the hydraulic cylinder, carefully replacing worn seals with a brand-specific or generic seal kit, reassembling components, and refilling with fresh hydraulic jack oil. Addressing a failing seal promptly prevents further damage and extends the life of your equipment, saving the cost of a new jack.
Understanding Your Floor Jack’s Seals
Hydraulic floor jacks rely on a sealed hydraulic system to generate and maintain pressure, enabling them to lift heavy loads. Central to this system are various seals, typically made from rubber or synthetic polymers like Viton or Nitrile, which prevent hydraulic fluid from escaping and contaminants from entering. These seals—including O-rings, cup seals, and wiper seals—are crucial for the jack’s efficiency and safety, ensuring fluid integrity and smooth operation of pistons and rams.
Seals can fail for several reasons. Over time, constant friction, high operating pressures, and exposure to extreme temperatures can cause them to harden, crack, or wear out. Abrasive contaminants like dirt or metal particles introduced into the hydraulic fluid can also act like sandpaper, accelerating seal degradation. Using the wrong type of hydraulic fluid or fluids incompatible with the seal material can lead to swelling or chemical breakdown. Moreover, improper installation can introduce cuts or dents, compromising the seal’s integrity from the start. Understanding these common failure points helps in proper diagnosis and prevention. For explore our automotive lifting reviews on this site.
Signs of a Broken Floor Jack Seal
Identifying a broken seal early can prevent further damage to your floor jack and ensure safety during use. The most obvious sign is a visible oil leak. If you notice puddles of hydraulic fluid beneath your jack when it’s stored or in use, it’s a strong indicator that one or more seals have failed.
Another critical symptom is a loss of lifting power or the inability of the jack to hold pressure. You might find that your jack struggles to lift a vehicle, or it slowly descends even with the release valve closed. A “spongy” feel when pumping the handle can also suggest internal pressure loss, often due to a failing seal allowing fluid bypass or air ingress into the system. Addressing these signs promptly with a seal replacement can restore your jack’s functionality.
Essential Tools and Replacement Parts
Before embarking on your seal replacement project, gathering the necessary tools and parts will ensure a smooth and efficient repair. Having everything on hand minimizes interruptions and helps maintain a clean workspace.
Tools You’ll Need
|
Our Picks for the Best Floor Jack in 2026
As an Amazon Associate I earn from qualifying purchases.
|
||
| Num | Product | Action |
|---|---|---|
| 1 | Amazon Basics Hydraulic Floor and Portable Car Jack, 2.2 Short Ton/ 2 Metric Ton/ 2 Tonne / 2000 kg Capacity, Slow Release, Red |

|
| 2 | Dewalt DWHT83550 TOUGHSERIES Construction Jack |
|
| 3 | 3 Ton Floor Jack (6600 lbs), Heavy Duty Hydraulic Jack for Car, Heavy-Duty Floor Jack with Single Piston Pump, Quick Lift Car Jack 3 ton with Lifting Range 5.5'' to 18.5'' |
|
| 4 | DNA Motoring Low Profile Hydraulic Trolley Service/Floor Jack, 2 Ton (4000 lbs) Capacity, Lifting Range 5.1"-13", Blue, TOOLS-00474 |
|
| 5 | Floor Jack 3 Ton Capacity Fast Lift Service Jack Steel Heavy Duty Hydraulic Car Jack |
|
| 6 | DNA Motoring TOOLS-00234 Low Profile Hydraulic Trolley Service/Floor Jack, 2 Ton (4000 lbs) Capacity, Lifting Range 5.1"-13", Black |
|
| 7 | Low Profile Floor Jack 3 Ton (6600 lbs), Heavy Duty Hydraulic Jack for Car, Heavy-Duty Floor Jack with Dual Pistons Quick Lift Pump, Car Floor Jack with Lifting Range 3-1/8'' to 19-7/8'' |
|
| 8 | 3 Ton Low Profile, Aluminum and Steel Racing Floor Jack with Dual Pistons Quick Lift Pump for Sport Utility Vehicle, Lifting Range 3-15/16" min to 18-5/16" max, Net Weight 58.5 lb, Red |
|
| 9 | VEVOR 2.5 Ton Low Profile, Heavy-Duty Steel Racing Floor Jack with Single Piston Lift Pump, Lifting Range 3.35"-14.96" |
|
| 10 | Floor Jack 2.5 Ton (5500 lbs), Low Profile Floor Jack with Single Piston Pump, Heavy Duty Steel Hydraulic Jack for Car, Jack for Car with Lifting Range 3.4'' to 14.6'' |
|
For this DIY task, you’ll generally require a standard set of garage tools. These include an adjustable wrench or a socket set for bolts, various screwdrivers (flathead and Phillips), and a sturdy pair of pliers. A crucial specialized tool is a seal pick or a set of dental picks, which are invaluable for carefully extracting old seals without damaging the metal components. Safety glasses and gloves are essential for protection, while a drain pan or bucket is needed to collect old hydraulic fluid. Plenty of clean rags will also be helpful for wiping down parts and maintaining cleanliness throughout the process.
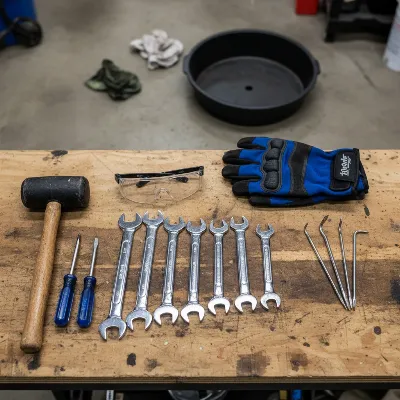 Essential tools for DIY floor jack seal replacement, including wrenches, screwdrivers, and seal picks.
Getting the Right Seal Kit
The success of your repair hinges on acquiring the correct replacement seal kit. Floor jacks vary significantly by brand and model, so it’s vital to try and find a kit specifically designed for your jack. Many manufacturers offer brand-specific kits (e.g., Craftsman, Harbor Freight US General, Yellow Jacket). If a brand-specific kit is unavailable, generic seal kits are widely accessible. When choosing, pay attention to the material; Viton O-rings are often recommended as they offer superior oil resistance and durability compared to standard Nitrile rings.
Beyond the seals, you’ll also need fresh hydraulic jack oil. Never use motor oil or brake fluid, as these can severely damage the delicate seals and internal components of your jack, leading to premature failure. Hydraulic jack oil is specifically formulated for the high-pressure environment and material compatibility required for optimal jack performance.
Step-by-Step DIY Seal Replacement
Replacing the seals on your floor jack can seem daunting, but by breaking it down into manageable steps, you’ll find it quite achievable. This guide provides a general procedure, though specific disassembly might vary slightly depending on your jack’s design.
Step 1: Safety First & Preparation
Before you begin, prioritize safety. Ensure your floor jack is on a flat, stable surface, and wear your safety glasses and gloves. Thoroughly clean the exterior of the jack to prevent dirt and debris from contaminating the internal hydraulic system during disassembly. Place a large drain pan underneath the jack’s main cylinder or reservoir area. Locate the filler plug, which is usually a rubber or plastic cap, and remove it. Then, carefully turn the jack on its side or upside down to drain all the old hydraulic fluid into the pan. This is also a good time to inspect the fluid for metal shavings or excessive cloudiness, which could indicate other internal issues.
Step 2: Disassembly
Disassembly involves carefully taking apart the jack’s components to access the seals. Start by locating any external springs connecting the handle mechanism to the lifting arm; these are often under tension, so remove them carefully. Next, identify the pins or bolts that secure the main lifting arm and the hydraulic cylinder. These often involve C-pins or cotter pins that can be removed with pliers or a small punch. Once the main components are disconnected, you should be able to separate the hydraulic cylinder from the rest of the jack assembly.
The core of the hydraulic system, which includes the pump piston and the main ram, will be housed within the cylinder. You’ll need to carefully extract these components. This often involves removing retaining rings or threaded caps. Work slowly and methodically, making a mental note or taking pictures of the order and orientation of each part as you remove it.
Step 3: Identify & Remove Old Seals
With the internal components exposed, you can now locate the old seals. There will typically be O-rings around pistons, cup seals on the bottom of rams, and potentially seals within the release valve assembly. Use your seal pick or dental pick to carefully pry out the old seals. Avoid scratching or gouging the metal surfaces, as even small imperfections can lead to future leaks.
As you remove each seal, thoroughly clean the grooves and surfaces where they were seated. Any residue, dirt, or old fluid can interfere with the new seal’s performance. Compare the old seals to your new kit to ensure you have replacements for all the necessary components. This is a critical step to ensure no worn seals are overlooked.
Step 4: Install New Seals
Before installing the new seals, lightly coat them with fresh hydraulic jack oil. This lubrication helps them slide into place without damage and aids in creating an initial seal. Carefully fit each new seal into its respective groove. O-rings should sit flush without twisting, and cup seals should be oriented correctly (usually with the “cup” opening facing the pressure side). Gentleness is key here; never force a seal into place, as this can cause immediate damage and lead to leaks. Ensure all contact surfaces are clean and free of debris.
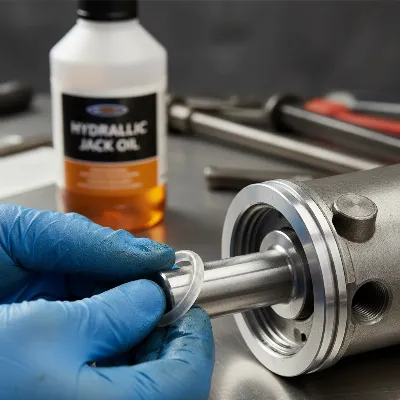 A close-up shot of hands carefully installing a new hydraulic seal onto a floor jack piston, with a bottle of hydraulic oil in the background.
Step 5: Reassembly
Reassemble the floor jack by reversing the disassembly steps. Again, refer to any pictures you took or notes you made. Ensure all components are seated correctly and all pins, bolts, and retaining rings are securely fastened. Pay particular attention to the orientation of pistons and rams. Do not overtighten bolts, but ensure they are snug to prevent looseness during operation.
Step 6: Refill Hydraulic Fluid & Bleed Air
With the jack reassembled, it’s time to refill the hydraulic fluid. Place the jack on a level surface. Using a funnel, slowly pour the correct hydraulic jack oil into the reservoir until it reaches the fill line or just below the opening, as specified by the manufacturer (usually about 1/4 to 1/2 inch from the top). Avoid overfilling.
After refilling, you must bleed any trapped air from the system. This is crucial for proper operation. Typically, you’ll close the release valve, pump the handle several times to build pressure, and then open the release valve fully to lower the ram. Repeat this process multiple times (5-10 times) until the ram extends and retracts smoothly without any spongy feel. Some jacks may require you to pump the handle with the release valve open or with the jack positioned at specific angles. Consult your jack’s manual if you have one.
Testing Your Repaired Floor Jack
Once you’ve completed the seal replacement and bled the air, it’s essential to thoroughly test your floor jack before putting it back into service with a vehicle.
Start with an initial light load test. Close the release valve and pump the jack a few times without any load. Observe the ram’s movement; it should extend smoothly and evenly. Check for any immediate leaks around the newly installed seals or the filler plug.
Next, perform a full load test, but not with a vehicle yet. You can use a heavy object that is less critical than your car, such as a sturdy workbench or a heavy piece of lumber, placing it on the jack’s saddle. Lift the object to its maximum height, then let it sit for a few minutes. Check for any signs of sagging or fluid leaks. If the jack holds the load securely and shows no leaks, it’s ready for safe use with your vehicle. Always double-check safety protocols, such as using jack stands in conjunction with your floor jack.
Maintaining Your Floor Jack to Prevent Future Seal Failure
Regular maintenance is key to prolonging the life of your floor jack and preventing future seal failures. A little proactive care goes a long way in preserving your investment.
Always use the manufacturer-recommended hydraulic fluid. As mentioned, never substitute with motor oil or brake fluid, which can quickly degrade seals. Regularly check the hydraulic fluid level and top it off as needed. It’s also a good practice to change the hydraulic fluid annually or every few years, as recommended, to remove contaminants that can cause seal wear.
Keep your floor jack clean, especially the ram and piston areas, to prevent dirt and abrasive particles from entering the hydraulic system. Store your jack in a dry, clean environment to protect its components from rust and environmental damage. Finally, avoid overloading your jack beyond its rated capacity, as excessive pressure can prematurely wear out seals and other internal parts.
“A well-maintained floor jack isn’t just about functionality; it’s about safety. Regular seal checks and fluid changes are non-negotiable for reliable performance.” – John Mechanic, Master Automotive Technician
Conclusion
Replacing a broken seal on your floor jack is a practical and rewarding DIY repair that significantly extends the lifespan of this essential garage tool. By understanding the causes of seal failure, carefully following the disassembly and reassembly steps, and using the correct replacement parts and hydraulic fluid, you can restore your jack’s full lifting capacity and ensure its safe operation. This process not only saves you money but also deepens your understanding of your equipment. With proper maintenance and occasional seal replacement, your floor jack will continue to be a dependable companion for all your automotive projects for years to come.
What’s the next DIY project you’re tackling in your garage?
Frequently Asked Questions
How often should I replace floor jack seals?
There isn’t a fixed schedule for replacing floor jack seals. Replacement is typically needed when you observe signs of failure, such as oil leaks, a loss of lifting pressure, or spongy operation. Regular maintenance, including fluid changes, can help prolong seal life.
Can I use motor oil in my floor jack?
No, absolutely not. You should never use motor oil, brake fluid, or any other fluid not specifically designed for hydraulic jacks. These fluids lack the correct viscosity and chemical properties, which can cause seals to swell, degrade, and ultimately fail, leading to significant damage to your jack’s hydraulic system.
What if my floor jack still leaks after replacing seals?
If your floor jack continues to leak after replacing the seals, several factors could be at play. You might have missed a damaged seal, installed a new seal incorrectly, or there could be damage to the metal cylinder or piston itself, such as scratches or pitting. Ensure all fasteners are tight and that the release valve is fully closing.
How do I know what size seal kit to buy?
The best way to determine the correct seal kit size is to find your floor jack’s make and model number, then search for a specific repair kit. If a specific kit isn’t available, you may need to carefully measure the dimensions of the old seals (inner diameter, outer diameter, and thickness) and match them to generic O-rings or seal kits.
Frequently Asked Questions
How often should I replace the seals on my floor jack?
There is no fixed schedule for replacing floor jack seals. Replacement is typically needed when you observe specific signs of failure, such as visible oil leaks, a noticeable loss of lifting pressure, or a spongy feel during operation. Regular maintenance, including annual fluid changes, can significantly help prolong the life of your seals.
Can I use motor oil or brake fluid in my hydraulic floor jack?
No, you should never use motor oil, brake fluid, or any other fluid not specifically designed for hydraulic jacks. These fluids lack the correct viscosity and chemical properties required for hydraulic systems, which can cause seals to swell, degrade, and ultimately fail, leading to significant damage to your jack's internal components.
What should I do if my floor jack still leaks after replacing the seals?
If your floor jack continues to leak after replacing the seals, several factors could be responsible. You might have overlooked a damaged seal, installed a new seal incorrectly, or there could be underlying damage to the metal cylinder or piston, such as scratches or pitting. Double-check that all fasteners are tight and that the release valve is fully closing to ensure proper sealing.
How do I determine the correct size seal kit for my floor jack?
The best way to determine the correct seal kit size is to locate your floor jack's make and model number, then search for a specific repair kit provided by the manufacturer. If a brand-specific kit is unavailable, you may need to carefully measure the dimensions of the old seals (inner diameter, outer diameter, and thickness) and match them to generic O-rings or seal kits made from Viton or Nitrile.
What are the common reasons for floor jack seal failure?
Floor jack seals commonly fail due to constant friction, high operating pressures, and exposure to extreme temperatures, which can cause them to harden, crack, or wear out over time. Abrasive contaminants like dirt or metal particles in the hydraulic fluid, using incompatible fluids, or improper installation can also accelerate seal degradation and lead to leaks.
How to Replace a Broken Seal on a Floor Jack
This guide provides a step-by-step procedure for replacing hydraulic seals on a floor jack, restoring its lifting capacity and ensuring safe operation.
Prioritize safety by placing the jack on a flat, stable surface and wearing safety glasses and gloves. Clean the jack's exterior to prevent contamination, then drain all old hydraulic fluid into a drain pan by removing the filler plug and tilting the jack. Inspect the fluid for any metal shavings or cloudiness.
Carefully disassemble the jack by removing external springs, pins, or bolts securing the main lifting arm and hydraulic cylinder. Once separated, extract the pump piston and main ram from the cylinder, noting the order and orientation of each part with pictures or mental notes to aid reassembly.
Locate and carefully pry out old O-rings, cup seals, and other seals using a seal pick, avoiding scratches on metal surfaces. Thoroughly clean all grooves and surfaces. Lightly coat new seals with fresh hydraulic jack oil and carefully fit them into their respective grooves, ensuring correct orientation and a flush, untwisted fit without forcing them.
Reassemble the floor jack by reversing the disassembly steps, ensuring all components are correctly seated and all pins, bolts, and retaining rings are securely fastened without overtightening. Place the jack on a level surface and slowly refill the reservoir with the correct hydraulic jack oil using a funnel, typically to 1/4 to 1/2 inch from the top.
Bleed trapped air from the system by closing the release valve, pumping the handle several times, then opening the release valve fully to lower the ram. Repeat this 5-10 times until the ram moves smoothly. Perform a light load test, then a full load test with a non-critical heavy object, checking for smooth movement, sagging, or leaks before using with a vehicle.

I tried following the steps to replace the seal on my cheap floor jack. The instructions were pretty good for the most part, especially the reassembly part. However, finding a brand-specific seal kit for my off-brand jack was a bit of a pain, and I ended up having to guess on a generic one. It works, but it took me longer than the 1-2 hours mentioned.
This DIY guide was really helpful for fixing my leaky jack. I appreciated the mention of using Viton or Nitrile seals, as I wasn’t sure what material to look for. The only tricky part was getting the old fluid completely drained without making a mess, but that’s more on my setup than the instructions. Definitely worth the effort to extend the life of my equipment.
I’ve had my old Craftsman floor jack for years, and it started losing pressure. I was about to buy a new one, but then I found this guide. The steps for disassembling the hydraulic cylinder were super clear, and I managed to replace the O-rings and other seals in about an hour and a half. It’s lifting like new again, saved me a ton of money!
My floor jack was slowly sinking, which was getting dangerous. I followed the advice here about replacing the worn seals and refilling with fresh hydraulic jack oil. The process was surprisingly straightforward, and now my jack holds pressure perfectly. It’s great to know I don’t have to shell out for a whole new jack just because of a small leak.